Tag Archives: DIY

Calm, Cheerful & Creative | Nursery Inspiration

Nursery-Inspiration-Board

Once I decided on the three words that would describe Denning Beta’s nursery, I set to work finding the items that would fill the space and help create a calm, cheerful and creative space. Of course, this room has got to work for us as well, meaning it needs storage for all of the baby things we have already started accumulating, a place for the baby to sleep and be changed, a place for us to sit and yes, a place to throw those dirty diapers.

I think we are off to a good start and I am increasingly confident that designing a room from scratch won’t break the bank. For all of the big furniture pieces (dresser, crib and rocking chair), we are using items that have been in the family. Thanks to some paint and handyman skills, they will be updated to suit our style and will be perfect for the nursery. For most of the decorations in the room, those will be hand-made to go along with the “creative” feeling of the room. My mom (Denning Beta’s Oma) is sewing a beautiful quilt for the crib that I cannot wait to share with you and I am hoping to knit the stuffed animals for the shelves, create the mobile and DIY some of the artwork. And for everything else there is Ikea, Target and the Land of Nod!

My goal is to have the room mostly put together in the next few weeks so that I can enjoy (or at least relax) those last few weeks of pregnancy before our life is turned upside down. And if that doesn’t happen, well, I doubt Denning Beta will hold it against me!

Product Sources: Cart // Baskets // Honeycomb Shelves // Caterpillar Art // Zebra Art // Pouf // Sheepskin

24 Little Hours

Is everyone humming the tune “What a Difference a Day Makes” now? What a great tune. You should check it out if you’re not familiar. Our 24 little hours weren’t changed drastically by love, well maybe they were; love from my parents who came down to Cincinnati and worked like energizer bunnies to help us tackle all sorts of house projects. I’ve said it before and I’ll say it again, when mom and Bob are in town, stuff gets done!

We joked about how they could have a very successful HGTV show about all the things you can accomplish in 24 hours with the right tools and a little guidance from an expert. If that doesn’t sound exciting, maybe getting a sneak peak at all we tackled around our house will motivate you to get working…or just sign up to be on the show.

Painted-WallsI forgot to take a before picture, but I’m sure you can guess what color was on the walls before.  That’s right… GREEN! Going for a light neutral has really brightened up the space. Now I walk by the room and think that I’ve left the light on, but really it’s just the sun reflecting off of a color that is not green and it’s amazing!

Fixed-FaucetWe replaced the pipe to our outside faucet because by the end of summer last year, it had stopped working. That fix probably took Bob about 10 minutes.

New-Cat-DoorWe pride ourselves on trying to have a home that doesn’t scream “Cats Live Here!!” when you walk through the front door, but for the last year the litter box has been out in the open in our piano room simply because we had no better place to put it. Phil and Bob built a “trap door” over our cellar entrance (because we don’t want the cats playing around on the dirt cellar floor) and installed a cat door so that the litter can be nicely hidden on the landing behind the door. Out of sight, out of scent.

Patched-HolesIn the bedroom that will eventually become the nursery, we had several holes to patch. First, there used to be a TV mounted on the wall and since we have no plans of ever having TVs in our bedrooms, we removed all the cables and plate covers and patched those holes. Then there was the fun of patching the hole in the ceiling that led to what we learned after buying the home was a “faux vent”, meaning the vent was just there for looks and not actually connected to our HVAC system. Obviously that made for a particularly cold bedroom (sorry to all our guests that stayed with us!), so we had a company install duct work and we then had to patch up the hole that led to nowhere. Still a couple more coats of plaster to go, but then we’ll be all set to paint!

Soffit-1Soffit-2And our biggest project was covering the newly installed duct work. Because our roof line is so close to the ceiling, our only option was to add the duct below the ceiling, so Phil and Bob built the soffit to cover it. It probably just needs one more coat, a good sanding and then will be ready to prime and paint. Such a huge relief!

If that’s not an impressive amount of projects, I don’t know what is. We were exhausted by the time it was all over, but I know that without their help, it would have taken us months of evenings and weekends to get all of this taken care of. Sometimes you just need a little help to get things started.

Painting Patience

When we announced that we were closing on our house, lots of people asked if we had flexibility in our schedule to get in and do some repairs and painting before actually moving in. Technically we did, since the lease at our apartment goes through next week, but we decided to go ahead and move in anyway. The idea of dragging out the whole living-in-two-places scenario did not sound appealing.

But even if we had gone the route of delaying our move, how do you know what colors to paint the walls without having lived in the space? Even after almost two weeks, I still don’t know what I want, but at least now I know that our family room needs a light, fresh color to reflect light because it is naturally dark and our living room will lend itself well to a warm color. How I am going to select exactly which color, I’m not sure, but at least I have a starting point.

Current-Paint

These are the colors that we are currently working with. I may not know what I want, but I know that I don’t want this! Do you have any tips for selecting colors? The idea of painting every room in our house is overwhelming. Any advice or tips would be greatly appreciated!

Krush on Keds

Remember good old-fashioned white keds?  I came across a pair in my closet recently and while I have no idea where they came from or how long I’ve had them (if I had to guess I’d say they’re from some high school musical, etc.), I’m thinking that I might bring them back into rotation.  Research, a.k.a. Pinterest, leads me to believe that there are actually plenty of options for my old Keds, especially with spring just around the corner. I haven’t decided whether I will keep them as is, rocking the all-white classics, or try my hand at updating them to a brighter color or pattern, mimicking the styles that Taylor Swift has been promoting on behalf of Keds.  What do you think?

Keds-Krave

Image credits (clockwise from top left): 1.  2.  3.  4.  5.  6.

Washi What?

If you’ve visited pinterest lately or spent time reading any DIY or lifestyle blogs, you’ve probably seen the rolls and rolls of beautifully colored tape scattered throughout.  It’s called washi tape and it originates from Japan.  You could describe it as… stylish masking tape?  What will they think of next.

Washi tape, like so many of my current obsessions, has been added to my wish list in hopes that if I’m extra good this year…I can get a few rolls for myself some washi tape!   So when my husband asked (as he always does when I am about to bring another item into our limited-storage-apartment), “But what do you use it for?”, I was surprised to find that I couldn’t come up with an answer to validate my wish.

Back to pinterest I went.  And I was not disappointed…

Washi-What

phone | frames | planner | gifts | flags | clips | playroom | card

Washi tape can be used to add color to a phone cover or computer keyboard, to decorate gift cards and wrapping paper, to frame photos and create a (removable) play room…the options are endless.

In what other ways are you using washi tape?  I will gladly accept a card decorated with washi tape.  Just let me know if you need my address!

Baby Blanket | Pink Checkers

I thought I would share the latest project to come off the knitting needles.  This was a special request from a work colleague of my mother’s.  Her first granddaughter is due in September and I am so pleased to have been able to knit the blanket that she will use to hold her.

I used my go-to yarn these days – Berroco Comfort.  It is the perfect texture for anything baby.  After the last, more intricate baby blanket, the mindless checkered pattern was a welcome change.  This is the kind of knitting you can do without thought.  It becomes a sort of meditation where the repetition of each block is an inhale and exhale…

One of these days, when the baby rush slows down, I’ll be able to cast on a grown-up pattern, but until then my world will be full of pastels and Berroco Comfort.

A New DIY Endeavor

Here’s a quick and easy project I tackled the other weekend to continue my updates in the kitchen.  I followed this tutorial and created a bright new lampshade.  It was a simple project and didn’t take too long, once I had the right materials.  So here’s what you need:

  • Lampshade – mine was 8″ across the top, 11 1/2″ across the bottom, and 9″ from top to bottom
  • Fabric of your choice (make sure it’s not too dark so some light can still get through)
  • Scissors
  • Pencil
  • Hot glue gun
  • Iron

1.  Prep the material – make sure that you iron your fabric.  It will inevitably have creases from being folded or rolled on the bolt in-store.  You will be disappointed when your project is completely finished and there is a big old crease that could have easily been ironed out.  Don’t skip this step!

2.  Prep the lampshade – Be sure to buy a flat lampshade without pleats or other decorative features so you can easily cover it.  The shade I bought did have a tiny bit of texture to it so I started by peeling off the trim on the top and bottom (just glue – so it was easy to remove).  It left behind a bit of a sticky residue, but that actually worked in my favor to hold the material in place for cutting.

TIP: One thing I didn’t think about until after the fact, was that my lampshade had a slant to it.  If you want this to be really easy, get a lampshade with the same diameter at the top as at the bottom.  If your shade is smaller at the top, keep in mind that you’ll need more fabric.  Luckily I had just enough with 1/2 yard to roll the shade the whole way around, but just barely.

3.  Measure and cut the fabric – I rolled the lampshade across the material and traced the top and bottom edge while doing so.  I used painter’s tape to secure the fabric to the seam of the lampshade so I would know where I started.  Then I trimmed along the lines leaving an extra inch at the top, bottom and each side.
4.  Cover the lampshade – Lining up the first edge of the material with the existing seam of the lampshade, I ran a line of hot glue on the shade itself and quickly secured the fabric.  At the opposite edge of the fabric, I folded over the extra 1″ to make a hem, running a line of glue down the material and folding it over to secure.  Then I wrapped the material around the lampshade, smoothing over it several times to make sure there were no bubbles (it helps to have an extra set of hands, but not necessary) and glued the hemmed edge down onto the already secured edge of the fabric to make a seam.

5.  Finishing – Once that seam was cool, I began working on turning under the top and bottom edges.  Because the brackets are at the top, I snipped slits in the fabric at those places so that it fold over smoothly on either side (x 3 brackets).  And then, you guessed it…more glue.  I went around in sections gluing the top edge down inside the lamp shade and flipped it over to do the other end.  You could add some edging to the top and/or bottom if you want a more finished looking edge.  I think for now I’ll leave it as is, but may consider adding something later on.

All in all it was a fun and easy project and for an $8 lampshade and $5 worth of material, a very inexpensive way to customize a space.  And the good news is that if I ever get tired of the fabric choice – I know how to change it!

My Repurposed Herb Garden

You’ve probably seen the living organic herbs that are now sold in the grocery store as an alternative to cut herbs.  Where we shop, the living herbs are usually a better price than the cut versions.  But I’ve always felt guilty just using up what I needed and then throwing the rest away – soil, roots, and all.  So I decided to see if I could get them to grow, re-potted of course, in my kitchen.

I started with basil and rosemary – two herbs that I know we will use should the plants flourish.  I already had two terracotta pots just collecting dust and taking up space in the house (they previously were home to plants that have passed on – so sad – and were painted to fit with the decor of an old apartment).  I saw this as the perfect opportunity to remake them into something more useful.

Here is what I started with:

We had a partially-used can of chalkboard spray paint left over from wedding projects, so I taped up the areas on the pots that I didn’t want to paint, and set to work on applying several coats of the chalkboard paint.  I think I ended up doing 3 coats in total.  Because it’s so warm down here, I was able to do all 3 on a Saturday afternoon.

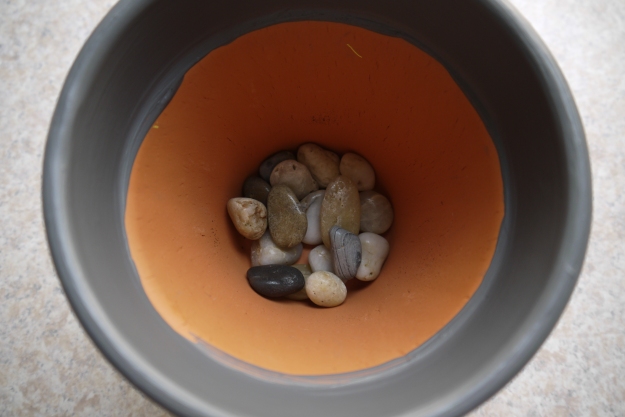
Once that part was dry, I peeled back the tape and applied 2 coats of Martha Stewart acrylic craft paint in Arrowhead.  Those were dry by the end of the next day, and I set about planting my herbs.  First I put a handful of stones in the bottom to make sure the dirt doesn’t run out  every time I water them.  Then I loosened the roots, added a few handfuls of potting soil, and inserted the plants.  I gave them a good watering – until it started to drain out of the bottom – and then used my white chalk to label the pots (though I should hope that I know the difference between basil and rosemary without having to read it!).

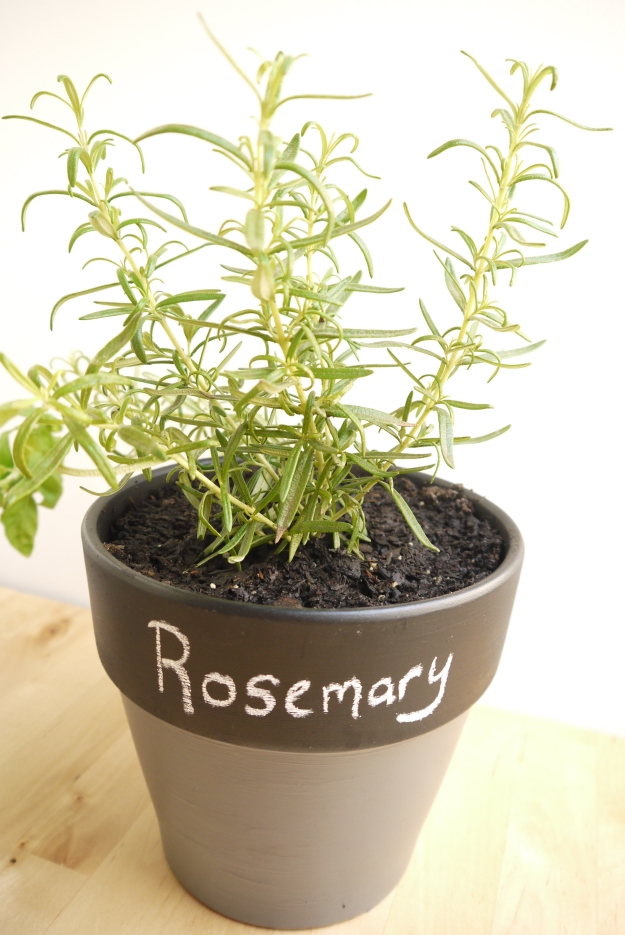
Ta Da!

I like the rosemary pot better with the chalkboard paint just at the top.  But I did the basil pot first so there was no way to know that then.  Maybe I’ll go back and re-do basil at some point, but for now it’s a project completed.

Also, the gray acrylic paint bubbled in two places on the basil pot – you can probably see it.  I noticed that the day after I completed the project.  Anyone have any idea as to why it did that?  Maybe it’s a good excuse to re-do it anyway.  Either way, it’s a quick and easy project for a weekend and a great way to start your own herb garden right on the kitchen counter.

Total Cost = $10.48

  • Rosemary & Basil fresh herbs from local grocery store – $3.99 X 2 = $7.98
  • Chalkboard paint (already owned) – $0
  • Gray craft paint from Michael’s – $1.50
  • Sponge brush from Michael’s – $1.00

A Productive Weekend In

I spent almost the entire weekend at home working on various projects, the biggest being adding some design to the kitchen.  I also managed to make it to the halfway point in my current knitting project, start a new book and watch some basketball – proud to be from Ohio!  At one point on Saturday I decided it was time to venture out of the house, so I set out to pick up a few items needed for a project and of course, ended up bringing home a few extras.

I know this is not fun or DIY project related, but I’m glad I remembered it as I passed by Office Depot because it is a necessity.  I am embarrassed to say that we haven’t started on our taxes yet!  I’m hoping that seeing this box everyday on the desk will make me feel guilty enough to finally sit down and get it done!

While I was there  for the tax software, I couldn’t help but pick up a few new pens for my journaling.  I am always in search of a pen that I will fall in love with.  Maybe these will do it.

I was side-tracked on my mission and ended up with some new shoes…oops.  I think they will be staple in my wardrobe this spring AND they were a steal!

And last but not least – what I actually set out for!  (supplies for several DIY kitchen projects)

I hope I didn’t use up all my energy for the week!  One of these weekends I’m going to do absolutely nothing.  But who am I kidding, I’ve never been very good at that!  Have a wonderfully productive week.

Weekend Highlights

I had a wonderfully uneventful weekend full of projects, fun and a little relaxing.  Here are a few pics from the iPhone…

The weekend started early when my yarn order arrived (the project shall remain nameless for now) and continued with a “Fun Friday” out for pizza and cocktails.  Saturday consisted of too many loads of laundry (and yes I almost washed my cat when I didn’t realize she was napping in the washer) and some crafty projects that will show up later this week.  That night we took a break for some coffee at the Orange Couch, and Sunday was much of the same but with a little cooking added in.

Glad to have accomplished so much this weekend because the week is going to be crazy!  Already looking forward to Friday.